

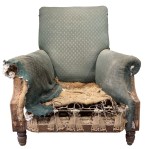
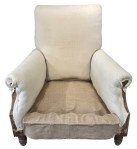
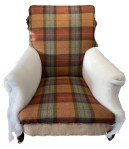
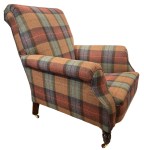
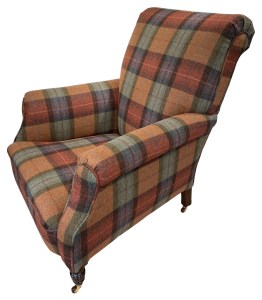
This is the second of a pair of armchairs. It started in a pretty poor state – but finished up looking a whole lot better!
This page is rather long. Should you wish to cut to the chase then please see a shortened version of both, available as Armchair Pair – Summary.
First task was to remove the remainder of the cover material. That left the underlying areas and stuffings and these were examined to see what needed to be sorted out.
Issues to solve were similar to the first chair of the pair – narrow seat, sagging bottom, dull polish and a need for new castors.
However, while the back on the first also needed work, additionally on this chair the seat needed to be rebuilt. Quite a list.
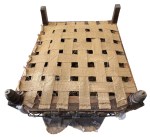

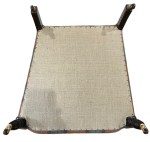
The seat was worked on from the bottom up. The sagging hemp webbing was removed and replaced with English black and white cotton webbing.

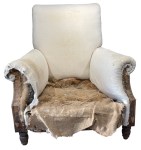
The hessian cover was taken off of the seat.
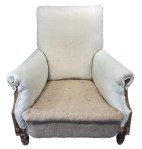
The opportunity was taken to strip the arms back and reduce the amount of stuffings on the inside, using some to raise the top of the arms. New through stitching was used to hold these adjusted stuffings in place.

A layer of hair was added and both arms covered in calico.
The laid cord holding the springs in place had broken in several places. The broken sections were replaced.
The springs were treated as two sections – the main seat and the seat front. The seat was kept level with a trough to the tightly bound seat front spring section.
A hessian spring cover was added. It extended over the seat springs, down into the trough, over the seat front springs and down to the frame. It was bound to the bar at the front of the seat.
Coir was added, filling the trough with an even layer everywhere else. Through stuffing ties were added to keep the coir in place and level the top.

A stitched edge was created over the top of the front bar.
Hair was added and that was covered in calico which was stitched under the front bar
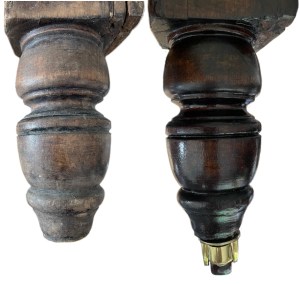
The legs needed work and this needed to be completed before the new cover could be added.
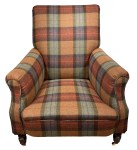
The dull polish work was rubbed down with fine wire wool, stained, coated in French polish and finished with wax polish, buffed to a burnished finish.
Once all the old fixing holes had been drilled out and hardwood dowels glued in place, new brass castors were added.

Polyester wadding was added as a barrier cloth under all pieces of fabric to ensure the chair conformed to current fire safety legislation.
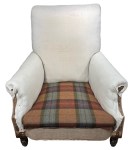
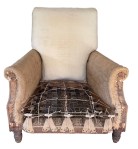
The seat fabric was added – as always, an eye was kept on symmetry!
The fabric was sewn under the front bar.

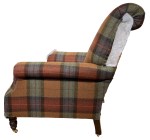
The inner back was added next, attached at the bottom over the seat fabric. The top was stapled in place and sewn around the space for the side covers.
The inner arm covers were added – mirroring each other. They were added over the seat front at the bottom, stapled under the arm at the top and pulled through to the outside at the back of the arm. The fabric was sewn around the arm front.
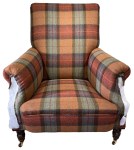
Piping was added to the seat front before it was attached. It was sewn under the front bar and stapled under the frame. At the sides, the fabric was stapled at the bottom with the ends of the piping pulled through, using a long needle, and secured under the frame, folding the fabric into the gap between seat font and arms.
Piping was added to the arm fronts, leaving the outer edge free. The arm fronts were sewn on and stapled down the outer edge. The piping was then stapled over the top of the fabric, running down the edge.
The outer arms were added using back tack strip under the arm and stapled to the back and under the frame, sewn to the piping of the arm front.
The side covers were added in the same way as the arm fronts but with an extended piece of piping that could be attached all the way to bottom of the seat frame.
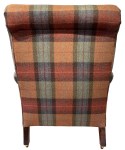
The outer back was added, using back tack strip at the top, stapled at the bottom and sewn down both sides to the piping.
The fabric was folded and secured around the legs.
A new undercloth was tacked on, covering the raw fabric edges.
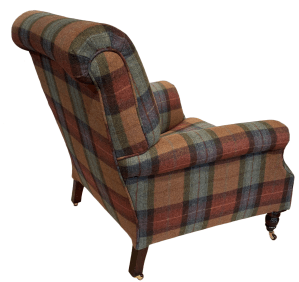
And that completed the second chair of the pair.
JBerryUpholstery has many examples of furniture Recovering and Restoration and also Soft Furnishings to add to or complement the finished items. You can see pictures of these in the Galleries– Recovering Gallery, Restoration Gallery, Soft Furnishings Gallery and Transformations.
If you have some upholstery that is in need of a bit of TLC or you are interested in Soft Furnishings then please contact us.
