

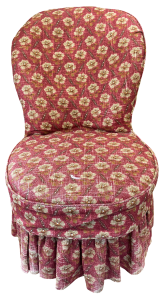

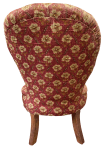
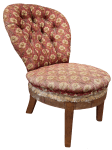
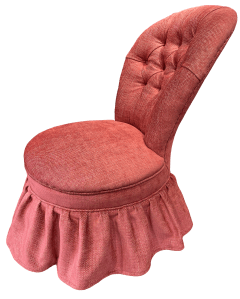
A small bedroom chair needed a new cover. The back was also floppy – repair work needed. And it provided some interesting surprises too.
At first sight, all looked fine. The existing loose cover, held on with hook and loop tape, was pulled off, That revealed another, same fabric but worn, fixed cover.
The chair was turned on its back and the under cover removed, along with fixings to the cover fabric.

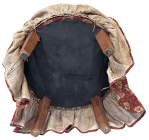
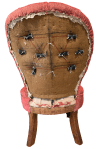
The chair was turned around and the outer back fabric removed. That exposed an old hessian back cloth and the fixings for the buttons.

The sewn on inner back was freed and the button fixings clipped. That also meant the seat skirt had to be removed too.


At the front, since the buttons that had held the inner back in place were now loose, that was sagging.
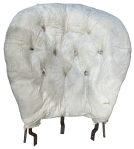
The inner back fabric was removed.

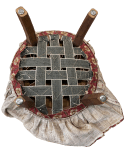
The seat fabric was next to be removed.
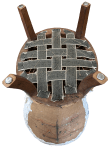
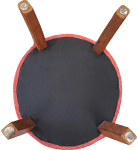
That allowed the structure of the seat to be revealed – this was an iron back. A real surprise.


On closer inspection though, the iron work had lifted above the frame, resulting in the loose back. While this was the cause, the solution still needed to be found.

The chair was turned upside down again and the old webbing removed.

That allowed access to some broken fixings and the seat and back were separated. With the fixings repaired and the chair rebuilt, new webbing was added and the springs secured.

The new cover fabric could now be added – starting with the buttoned inner back. The fabric was secured with long ladder stitching around the back to create tension.


The seat was the next piece to be added, attached with a long back stitch to the seat stuffings.
The seat skirt, with piping already sewn on, was added around the base – sewn at the top, stapled under the frame.


At the back, the fabric was tidied up, then covered in barrier cloth.
The back fabric was then sewn on around the sides – stapled under the frame.
A new undercloth was added, covering the fabric edges under the base.
Finally a pleated skirt was added around the base to complete the project.
JBerryUpholstery has many examples of furniture Recovering and Restoration and also Soft Furnishings to add to or complement the finished items. You can see pictures of these in the Galleries – Recovering Gallery, Restoration Gallery, Soft Furnishings Gallery and Transformations.

If you have some upholstery that is in need of a bit of TLC or you are interested in Soft Furnishings then please contact us.
