


This attractively shaped winged chair probably dates from around the middle of the last century when Parker Knoll, G-Plan and others used the tension springs that support the seat of the chair.
While the chair needed a new cover, the repair work needed meant this was a restoration project. The front needed to be repaired. The spring bed had one spring which had come adrift and needed to be fixed back in place – although the springs were in good condition and will be reused.

The legs had lost their shine and had faded – so need sprucing up. The seat cushion has a curious feel – but it is quite usable – and just needed a new piped, zipped, box cover.

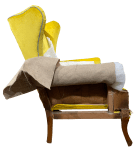
The chair was taken into the workshop. The front of the frame was loose and only held in place by the fabric and springs. The fabric wrap was taken off and the springs unhooked. The front was gently removed and the springs and spring cover, still fixed at the back, dropped down.


The fabric at the back was freed of fixings and taken off.

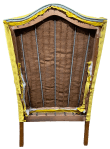
The springs were now unhooked at the back – they were stored for reuse.


The fabric covering the side – outer arms and outer wings – was removed. It was noted that a couple of joints at the top of the back were loose.


The fabric of the inner arms and wings were removed. The support hessian of the wings was noted as slack.

The final piece of fabric to be removed was the inner back. Time to make repairs and recover.

The legs were rubbed down, stained and French polished. Wax polish was applied and the legs buffed to a pleasing sheen.


The front piece was reattached, the back joints reglued and the support hessian for the wings tightened. Replacement staples ere added for the loose spring.

A barrier cloth of polyester wadding was added over all internal surfaces. This ensures the chair complies with current fire safety legislation.
The new fabric was added over the inside of the chair.

A new spring cover was made the same width as the spring bed with the two outer springs passing through channels in the sides. Hessian was used as a strong backcloth to the cover fabric.

The springs were hooked back in place, which included the ones within the spring cover. The front piece of frame was covered in fabric, extending backwards to cover the front of the spring cover.
Piping was attached around the edges of the wings and across the top of the back.


A new support cloth was added to the outside of the wings. That was covered in barrier cloth and finally the top fabric.


For the outer arms, cover fabric, barrier cloth and support hessian were all fixed in place behind back tack strip.

They were then pulled down and fixed in place in reverse order.


To fit the arm fronts, first felt was added, then barrier cloth.

The arm fronts were made up with piping attached to the inside edge and extending to the outside edge.
The inside edge was stapled in place. The front pulled over and the rest sewn around the roll and down the outside edge.

At the back, support cloth and barrier cloth were stapled in place. The cover was sewn on to the top and sides, stapled under the chair, cut and folded around the legs.

A new cover was made for the cushion.

And with that in place, the project was complete.
JBerryUpholstery has many examples of furniture Recovering and Restoration and also Soft Furnishings to add to or complement the finished items. You can see pictures of these in the Galleries – Recovering Gallery, Restoration Gallery, Soft Furnishings Gallery and Transformations.
If you have some upholstery that is in need of a bit of TLC or you are interested in Soft Furnishings then please contact us.
