


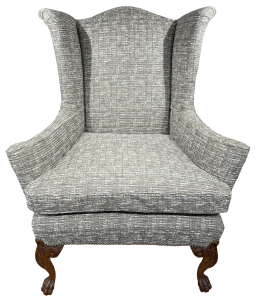
This chair appeared to be paired with a small Two Seater Sofa but actually the two were only alike in the fabric cover and the shape of their legs! The sofa is the subject of another project.
The chair was first to be recovered. There were several surprises with the type and state of the materials used – all of which are addressed as the project progresses.
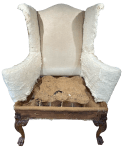
The old feather cushion pad needed replacement and a new one was obtained ready for a new cover.

With the seat cushion removed and it was noted that one side of the seat appeared a little low. But why?

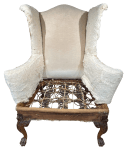
With the chair on its back, the undercloth and all the fixings under the frame were removed. In place of fabric webbing, metal strips supported the springing ensuring there was no possibility of the base sagging. So why was the seat sagging?
Peering inside, it became clear that the spring hessian – covering the top of the springs and supporting the seat stuffings – had rotted and split. This allowed the seat stuffings of cotton wadding – visible to the side – and black hair – visible to the front – to collapse, leaving the sunken seat top.
Additionally, there were many broken spring ties. All these issues need to be corrected.
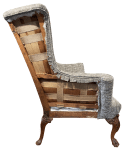
With the chair upright, all of the old brass nailing was carefully removed. The wood frame had suffered damage from tacks and nails. Repairs will be needed to the more damaged sections to ensure the new nails have a sound base.
The old fabric was not FR treated nor was there a barrier cloth – so the chair was not compliant with current fire safety legislation. Perversely the new cover was FR treated but barrier cloth will be added anyway to improve the comfort of the chair.


The slip stitching holding the back to the sides and the top was removed. The fixings holding the fabric and piping were also removed.
Three short pieces of webbing connected the frame pieces on one side of the back. They were removed without anything happening and while they will be reinstated, their purpose will remain unknown.


At the side, the outer arm fabric was removed – sewn to front and top with a short piece of back tack used at the front of the arm.

The support cloth and all other visible fixings were removed.
The outer wing fabric was removed – there was no support cloth – and again, all visible fixings were extracted.


On the inside, the hand stitching securing the wing to the arm was cut. The sewing holding the inner arm to the seat front was also snipped. The arm top had also been sewn into the stuffings and was sewn on with piping in the seam.

With the fabric freed, both the inner arm and wing covers were pulled free.
The inner back fabric was pulled free – all fixings having been removed earlier.
The seat fabric was stapled to the frame at the sides and sewn to the calico cover over the back section of the seat. The join was sewn into the stuffings – and with that cut, the seat cover could also be removed.
With the cover completely removed, work could be started on the seat repair work. The stuffings to the front of the seat were lifted away and then the remainder.
The spring cover was in pieces and the laid cord holding the springs in place had failed to the left of the seat. The stuffings that had sunk into these spaces were also removed.
Finally, the remnants of the spring cover was removed – it was time to start to rebuild.

The seat frame had many old tacks left over from previous covers and these were cleaned off.
The broken laid cord was replaced on the left of the spring bed – new pieces were tied to the old and secured to the frame.

A new spring cover was secured over the spring bed and ties added to hold the springs to the cover.

Stuffings were added over the spring cover. The front edge had an existing roll on it – so no need to stitch the edge. Barrier cloth was added to complete the rebuilding of the seat.
The seat front fabric was sewn to some heavy duty calico and the construct placed over the seat. The seam line was sewn through the seat stuffings first, before the sides of the seat were secured to the frame.

Next the inner back was fixed in place. The inner arms were made from two pieces of fabric – one the inner side, the second forming the top of the arm. The seam included piping that curved around the front of the arm, the other end passing through to the back of the chair. Both were secured in place.

The final inner pieces were the two wing covers. Before they were added, some webbing was added to push the stuffings forward. These pieces had piping sewn to their lower edges – which was hand sewn to the top of the inter arm fabric.

Before the outside of the chair was covered, piping was added running from one arm, over the back and ending on the other arm.
Support scrim was added over all areas and then covered in barrier cloth.
The outside cover of the chair was completed in a slightly different manner to the original.

The original two pieces, with hand stitched seam for each side, were replaced with single pieces of fabric covering the outer arm and wing.
The outer back was sewn on – both sides and along the top.
New brass nailing was added to the base of the seat.

A new under cloth was added.
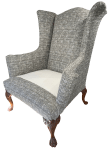
Finally, the new, shaped pad was inserted into the box cover – with piping and zip.

JBerryUpholstery has many examples of furniture Recovering and Restoration and also Soft Furnishings to add to or complement the finished items. You can see pictures of these in the Galleries – Recovering Gallery, Restoration Gallery, Soft Furnishings Gallery and Transformations.
If you have some upholstery that is in need of a bit of TLC or you are interested in Soft Furnishings then please contact us.
