

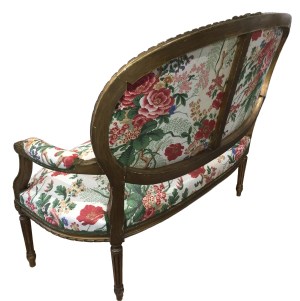
This surprisingly named 19th century French canapé needed a new cover. The frame was in good shape and the finish would be left untouched.

First task was to remove the old cover. The back stuffings would have to be removed completely, so the chair was turned over and work started.

The old cover and the layers below it were carefully removed – saving some for reuse, discarding others.
Eventually the original back cover fabric was removed and rebuilding could start.

A piece of the new fabric was cut out.

The pattern included a prominent rose and the piece of fabric was cut so that the rose image appeared on either side of the central divide.
Over this, woolguard was stretched to form an FR layer and conform to legislation.


The intermediate layers of hessian (to provide support), the original stitched stuffings and cotton wadding were added, finishing with another layer of woolguard stretched over the top – the nature of the material providing a smooth surface for the cover fabric.

The arms were worked on next – removing the layers covering the stitched stuffings – and a lot of dust.

Woolguard was used to cover the original stuffings on both arms.

The old cover fabric was removed to reveal an under layer over quite sound stuffings and springing.

The existing layer was better secured before more woolguard was used to cover the seat.
Now adding the cover fabric could begin.
A piece of the cover fabric was cut out, this time with the prominent rose placed centrally. The fabric was thrown over the seat and pulled hard to all sides.

Close stapling was started in the centre of the front and taken out close the corners. This was repeated for the other three sides.

At the four corners, the fabric was cut and eased in around the arms and back supports.
The close stapling was then completed, running up beside the supports and around them.

The back was tackled next, with a piece of fabric selected with the rose motif placed centrally and in line with the seat.

The fabric was pulled to all sides. Stapling started in the centre of the two long sides, keeping the fabric tensioned as progress was made to the ends.
The arms were the last to be tackled. Two identical pieces of fabric were cut and attached to the two arms.

To complete the project, a green braid was chosen.
The braid was glued on, starting and ending at corners for the seat and arms and the middle of the bottom of the back to hide the joins.


A pleasing project to have worked on.
JBerryUpholstery has many examples of furniture Recovering and Restoration and also Soft Furnishings to add to or complement the finished items. You can see pictures of these in the Galleries – Recovering Gallery, Restoration Gallery, Soft Furnishings Gallery and Transformations.
If you have some upholstery that is in need of a bit of TLC or you are interested in Soft Furnishings then please contact us.
