

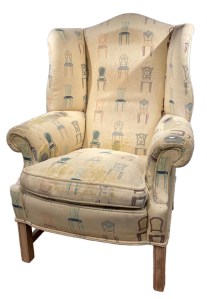
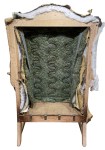
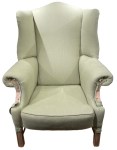
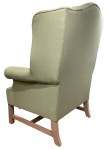
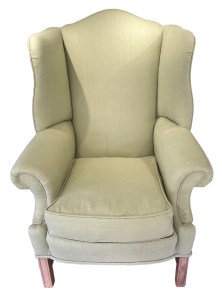
This wingback chair, bought some 25 years ago, is a much loved and used chair. Consequently the fabric has worn. Once the fabric has been replaced the chair will give many more years of use.
Additionally, the seat pad will be replaced and an extra throw cushion made to carry the new fabric colour to other parts of the room.
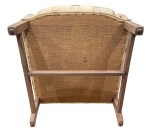
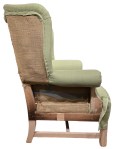
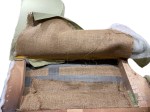
The undercover was removed and a date on the spring bed revealed it was made in 1997.
The staples all around the base holding the outside covers were removed.
With the chair upright, the fixings holding the fabric to the outside of the arms and back were removed.
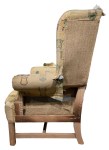
This included removing a layer of polyester wadding and support hessian as well as fixings for the inner layers of fabric.
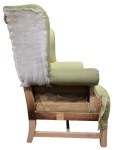
That process was continued to all sides and the wings, removing all visible fixings and pulling off the arm fronts. The ply formers will be reused.

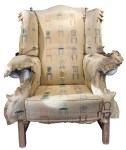
Most fixings of the inner pieces of fabric had been removed. With those gone the fabric was pulled free.
Looks messy but a lot quicker than removing the outer pieces!
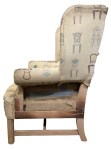
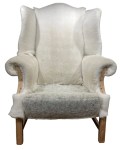
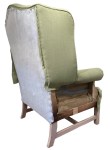
With the chair stripped, recovering could begin.
With the chair stripped, adding the new cover could restart – replacing fabric in the reverse order of it’s removal.
The seat cover was made from three pieces of fabric. The main seat was split in two with the seam running across just behind the arm fronts. The seat front was added with piping along the top edge.

This whole section was added with the seat seam sewn into the seat stuffings using nylon button cord.
Next came the inner arms, pleated around the arm fronts.
Finally the inner wings were added, followed by the inner back.
With the inside part of the chair completed, the outside could be covered. Three layers for each panel of fabric makes this a little harder.
All outside pieces of fabric were backed by a layer of hessian – to provide support – and then polyester wadding – to comply with fire safety legislation.
The wings were tackled first. The three pieces – two wings and (later) the outside back – were all edged with a continuous piece of piping.
Adding fabric to the outer arm entailed adding fabric in the reverse order to the others – first the cover fabric, then polyester, then hessian, with back tack strip holding the lot in place in a line under the arm.
All the fabric pieces were laid over the top of the arms and then pulled down and secured in place in turn.
The outer back fabric was slip stitched in place, sewing through the piping along the top and down both sides, connecting to both the outer wing and arm fabric.
The bottom edges of all pieces were secured under the frame, tidying up around the legs.
The original arm front ply formers were covered in fabric and then edged with piping.
They were hammered into place with a soft blow hammer.
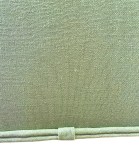
Double piping was added around the base of the chair – the join at the back wrapped in fabric.
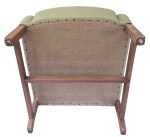
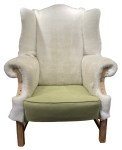
An under cover of hessian was tacked into place. Chair finished!
A new seat cover was made – 10cm deep instead of the original 7cm. It will be filled with a new feather quilt wrapped foam pad. For now, the old, thin, feather filled pad was included.
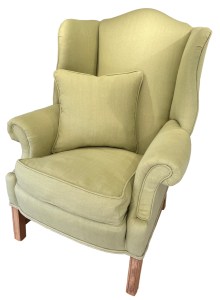
An 18” feather filled throw cushion, piped and zipped, was made, using the same fabric.
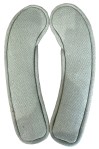
Arm covers were also made. Accessories such as throw cushions, arm covers and antimacassars are easily added to a project, likely using offcuts. Cushions can be used to carry the colours used on the chair to other parts of a room. Arm covers and antimacassars help protect the chair fabric.
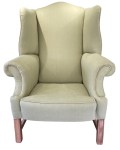
The project was complete!
JBerryUpholstery has many examples of furniture Recovering and Restoration and also Soft Furnishings to add to or complement the finished items. You can see pictures of these in the Galleries– Recovering Gallery, Restoration Gallery, Soft Furnishings Gallery and Transformations.
If you have some upholstery that is in need of a bit of TLC or you are interested in Soft Furnishings then please contact us.
