

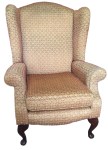
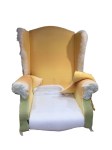
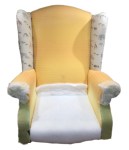
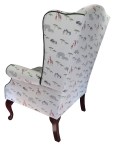
This winged chair was to be recovered. While the existing fabric was a little worn, the main reason was the need to use the chair for nursing a new addition to the family.

This chair used modern methods of construction with modern types of fixtures and stuffings. That changes the sequence of recovering, so detailed notes were kept. The new cover was added using more traditional methods.
The cushion was removed – it’s cover would be made later.
The chair was turned over and the legs unscrewed.
The remnants of an undercover were removed and all fixings for the fabric cover taken out.

At the back, the rectangular section was attached on both sides by nailed on strips which were eased off. The top was also freed and the panel removed.

The curved front edge of the outer arm was held in place with metal gripper strips, the top with back tack strip and with those gone, the outer arm covers were removed.
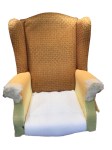
The arm fronts looked like the next pieces to be taken off and fixings all round were removed. But no, it was the seat that came off next!
And immediately followed by the arms.
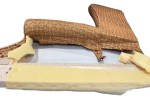
Pulling the seat wadding forward allowed the bottom of the inner back fabric to be freed and then removed.
The inner wing fabric was secured under foam that had been added later. The fabric was cut to allow the wing covers to be removed.
To recover, the sequence was reversed – with some changes to allow for a slightly different approach. While the old cover used FR fabric, the new cover needed FR polyester wadding underneath each piece to comply with legislation.

The inner wing fabric was added first and then the outer cover, with piping already attached, was slip stitched to it, the other sides stapled.

Arm covers, already prepared with arm fronts attached and piping sewn on around the front and where it passed by the wing, were pulled on and fixed in place.
The inner back was covered next. (The little bits of polyester in the image were pinned on to protect the fabric as the chair was rolled around.)
The seat fabric was fixed in place.
With the chair on it’s side, fabric was first stapled under the arm with back tack strip to keep the edge straight. When pulled down, the outer arm cover was fixed on all sides.
For the back, the fabric was slip stitched to the top and sides, stapled under the frame.
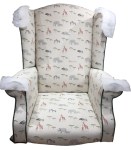
With the legs screwed back in place, an undercover was added to complete the recovering work.
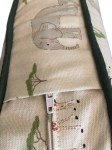

Fabric for the cushion cover was cut out, shaping the back edge to follow the shaping of the seat. A gusset with piping and zip was made up and the cushion cover constructed.
Of note were the “pockets” created by folding the fabric back on itself over an over length zip. This allows the zip pull to be tucked neatly out of sight.
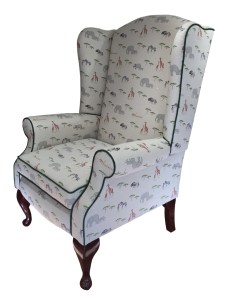
With pad inserted, the work was complete.
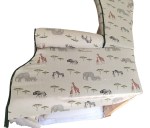
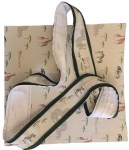
Since the chair was to be used in the nursery some protection for the new cover seemed advisable! Removable and washable accessories were made up – an anti-Macassar and arm covers.
The completed chair was returned to it’s owner along with the Soft Furnishings accessories.
JBerryUpholstery has many examples of furniture Recovering and Restoration and also Soft Furnishings to add to or complement the finished items. You can see pictures of these in the Galleries– Recovering Gallery, Restoration Gallery, Soft Furnishings Gallery and Transformations.
If you have some upholstery that is in need of a bit of TLC or you are interested in Soft Furnishings then please contact us.
